Showing posts with label project start. Show all posts

Wednesday, February 8, 2012

Starting work on the Land Raider...

Here we go!
 Ok, I've done a total of 27 space marine infantry figures thus far.  That is sanding down mold lines, priming, assembling, gluing, holding while the glue sets, painting, second coat-ing, washing, detailing, and second coat detailing, over two dozen little guys.  And I still have more to do.  But I needed to do something else because I have gotten really, really, REALLY bored worked on little people.  Good thing I had a land raider crusader/redeemer sitting on the shelf waiting to be worked on, because it is exactly the kind of thing I was up for working on.  So I am.  I figure this is going to take me about 20 hours to do, which means it could take me two or three weeks to finish, depending on how busy I am.  I would love to see my complete kick ass looking land raider right now, but its a labor of love, and the more time I spend on it during painting and construction, the more I'm going to get out of it when its finished.  And here on the blog I'll document the progress of the project.

Ok.  The Land Raider Crusader/Redeemer is one of the biggest models there is in Warhammer 40K, and possibly the biggest model for the entire space marines army.  It clocks in at 124 parts- the Storm Raven Gunship for the Blood Angle Space Marine faction, which is probably the vehicle closest in size to the land raider, has 116 pieces.  In game play, the Land Raider Crusader gives me 12 Strength 4, armor penetration 5, twin linked (meaning you get to roll twice to hit) shots from the side mounted storm bolters that shoot 24 inches.  The top mounted assault cannon gives me a 4 strength 6, armor penetration 4, twin linked shots.  It can carry 16 infantry figures who can assault on the same turn the disembark.  It has armor of 14 all the way around.  Right out of the box, before you add any additional weapons such a multimelta to kill other vehicles, this thing is fast moving, enemy infantry shredding, moving fortress bar none.  I plan on throwing my terminators inside and just demolishing the armies of my foes.  Hordes of cheap orks or necrons?  Bring 'em on.  But first I need to build the thing.

Its gonna take me a while to get this all put together.
As I said, this thing has a *ton* of pieces.  Here are the sprues untouched, just out of the box.

Yeah.  That's almost as many items as were in the entire Assault on Black Reach Warhammer 40K starter kit.  I love seeing all these pieces though.  It reminds me of when I was a kid and got the Lego Blacktron Message Intercept Base for my 9th birthday.  There were sooooo many little bags of lego pieces to put together.  That thing was HUGE.  I remember that it took me 5 hours to put it together.  I *loved* that toy.

Well, as my mother always said, "the bigger the boy, the bigger the toy."

This thing isn't going to be done in 5 hours.

First step, wash off the sprues.  Its a pretty standard step.   I want to get all of the oils and whatnot off of the plastic before I start going to work on it.  I want the primer and paint and glue to go on without any problems, and I don't want any little bumps or ridges screwing up the pieces or the fittings between them. Little soap, little water, little kitchen sponge action, little drying off, we done.  There were a few parts with little crevices where water had beaded up and I couldn't reach it with a towel, so I let the sprues air dry for about an hour before I applied the spray on primer.

I've done enough blogging about my priming and I think you all get the picture.  It took me a while to prime everything, flip it over, and prime it again, and let it all dry.  There are six separate sprues in the package, and my spray paint box was only big enough to spray two at a time, so I would spay them out, wait ten minutes, flip the two I was working on over, do them again, wait ten minutes, take the finished ones off and put the new ones on, and repeat.

A detailed section of the inside of the Land Raider.
Based on my work on my rhino space marine transport, I have decided to work on several pieces of this project while they are still on the sprue instead of cutting everything out and working on them seperately.  I decided to do this for a few reasons.  First of all, it makes it much harder to misplace any of the pieces.  With 124 parts, and some of them very small, its easy for something, such as the instructions, a painting book, the paper towel I use to clean of my brushes, etc, to cover up a piece, which results in my wasting time looking for something, and its kind of a buzz kill.  Second of all, keeping the pieces on the sprue makes it very easy for me to paint the pieces and move the 'em around to get the bast light and painting angle without ever having to touch the piece itself.  Less smudging is better.  Third, it cuts down on items getting knocked around, scratched or otherwise banged up.  So hey- I'll see how it goes. I know it'll mean that I need to repaint the places where the pieces connect to the sprue after I sand down the connection spots after I clip the pieces out.  I'll have to see if it is worth the hassle.
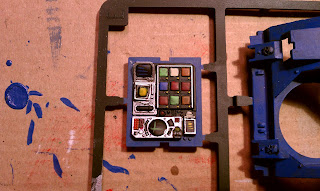
One last pic before I end this entry.  This picture shows a computer counsel that will also be on the inside of the land raider.  The instructions call for constructing the land raider from the inside out; its pretty much impossible to paint the interior once the the model has been constructed, so I need to work on detailed parts like this now.  The rest of the model, while big, isn't especially detailed, at least not in comparison to the interior of the raider.  I bet at this point I have put in about 3 hours of out and out work, not waiting for something to dry work, on this thing.  And I keep working on it.  I'll have more photos soon.

Until next time,

David D.

Sunday, November 20, 2011

A new project begins

Brushwork worthy of kindergartners!
It has been a dark time for David's Workshop.  While David did enjoy building the HQ display and painting the coyote, it was clear to David that he had reached the limits of his painting skills, especially in terms painting individual action figures. Despite the fact he researched action figure painting techniques like crazy on the web, he was stuck just not quite getting it.  His figures looked like a mess, and David was frustrated.

Hope seemed lost.  Nothing seemed to be working out the way he wanted it to, and the path to improvement seemed lost.  Buying action figures to practice with was expensive- Joes were $8.00 a pop at least at the local Target and Walmart, and David didn't seem to have the hand control or the sense of what he was doing to justify painting figure after figure after figure with the same cruddy results time and time again.  David was about to throw in the towel.

Spay paint that looked horrible!
But Lo!  In his darkest hour, David walked into the store Air Traffic at the mall during a break in holiday gift purchasing.  Air Traffic is a great store based out of the Twin Cities of St. Paul and Minneapolis that carries games, smart kid toys, kites, disc golf, model rockets and juggling supplies, as well as Warhammer 40K items and Games Workshop painting supplies.  Basically, it is a nerd store camouflaged as toy/game store.

David loves Air Traffic.

Even before he started work on his workshop, he would often walk in and look at the display cases of Warhammer armies with longing and wish he was skilled enough to paint as well as the people who had painted those miniatures, as well as the guts to actually buy miniatures like them and paint 'em.  David was raised by parents who were good, but not very open to their son being interested in nerdy pastimes like RPGs and minitures, so David was forced to enjoy them from afar.  Since his teenage days, he had been especially impressed with the folks who painted miniatures.  The people who did it well had crazy amazing skills.  The creativity to come up with a plan and the ability to execute on that plan, resulting in such such awesome final products made him a fan of anyone who can paint figurines well, regardless of how annoying anyone but their mother finds them or their ratio of years on this planet to the number of sexual experiences they have had with people other then themselves. These people were doing something they enjoyed, and it was something David did not have the guts to try on his own.  He feared the disapproval of his parents, and he feared sucking at it.

By the power of Grayskulll! 
I HAVE THE POWER!!!!!
But times change.  On this day at Air Traffic at the mall, (just last week), David found the book How to Paint Citadel Miniatures on the shelves next to all the other Warhammer 40K guidebooks.  It was a sign.  He picked up the book and flipped through it.  It wasn't just the full color illustrations that caught his eye-it was the step by step instructions on how to paint plastic miniatures in a bunch of different ways.  There were sections of preparation, color theory, blending, techniques to steady one's hands when painting, how to add effects like rust and wear to the painted object, dry brushing, diluting paint, washes, the list just went on and on.  The book was $30, which seemed pretty insane, but he had tried so many times and really wanted to get good at this.  So he bit the bullet and bought the book.

On top of this, his local Walmart sold a line of figures called The Corps, which were only about $1 each when you purchased in 3 packs.  The figures are not as nice as Joes, but they are inexpensive, easy to take apart, identical in size, and nearly identical in complexity of figure and accessories.  Take the guy I have over here.  His name is Kinji "Rain" Shinto and according to his packaging, he is part of the Corps Shinobi Squad specialized ninja assault team.

I am going to be fodder for David's next project!
This brings us to now, and I'll leave more summary third person past tense and switch gears to more intimate first person present tense. 

Ok, save your cracks about western stereotypes about Japan and far eastern culture. David thinks: duly noted.  Especially since Mr. Shinto-San's skin is as white as the peachiest of peachy peaches.  But this figure has potential.  He has nine points of articulation- knees, hips, elbows, shoulder (ball joints) and head.  He has three accessories- a bad ass looking pistol, a ninjaken (aka ninja sword, thank you google). and a totally inaccurate but still cool looking spinny throwing knife looking thing.  All of these items can be carried on Mr. Shinto-San's person.  The figure has a built-in sheath on his back, a holster for the gun on his right shin, and the handle for the spinny throwing knife fits into the hole in his back where the screw that holds the figure together goes.  In addition, the detail in the figure, while not great, isn't horrible.  His boots and chest armor are especially detailed.  He needs a new skin tone, and the copy paper white pants need to go, and his weapons need some paint as well, but I think this guy could be slick.  And now I'm armed with the book and I've got the courage to try a new project.

Alas, time has run short on this weekend, and I don't have time to start work on the project, take the pictures and write an update.  I haven't done an update in a while, so I thought I would take care of that, and then over the next week start work on the project.  When I have some results, I'll post it.  At the moment, here is my plan: 

1. dremel down the the rub points in the shoulders, elbows, hips and knees. 
2. disassemble the figure, including removing the lower legs/arms from the upper legs arms through the use of a hair dryer. 
3. wash all the pieces in water to get grease and whatever else is on them off.
4. spray paint the pieces while for a base coat with plastic friendly spray paint.
5. pick a color theme.  I am thinking either black/green/yellow or silver/blue/black, plus a more asian skin tone. 
6. engage that theme with the painting skills I pick up from the book!
7. go slow.
8. have fun.
repeat 6-8 over and over.
9. profit!

We'll see how it all goes.


Until next time,

David D.