Showing posts with label Land Raider. Show all posts

Friday, February 24, 2012

Its ALIVE!

Work on the Land Raider is almost done!  I'll have a full post soon, but until then, here are some pictures to enjoy while you wait.


David

Thursday, February 16, 2012

Progress On The Land Raider

I have made some progress on the Land Raider since my last post on it.  Lots to cover.
And this is what it looks like before I even add the weapons.

First of all, this thing is cool as hell.  The photos aren't perfect- getting a camera stand, some decent lighting and whatnot is on my to do list- but even if it doesn't look bad ass in the pictures, it is when you look at it in person.  This thing just kind of grows in aspects and areas of coolness as it is assembled and painted the way a town in the old game SimCity does.  At first, its just look little piece of this, cool little part of that, then it gets bigger, and you're like, hey, I'm cooking now.  And then you do a little more, and its three times cooler than it was before.  And you do a bit more work, and suddenly, its twelve times cooler.  And before you know it, you've spent six hours on the thing and you have an airport and a sports stadium and no crime and 100% fire coverage and the best road and mass transit system going ever and you look down on your little creation and you think, damn... I made that!

Instead of a door, there is a space marine supply
cupboard in the door frame here.  Um... Why don't
they just keep all that stuff inside the Land Raider proper?
Right now, I'm nearly done with the color blocking of the outside. I used a thick brush to get the big sections of things with two layers of ultra marine blue, and need to go in with smaller brushes to get in the nooks and gaps.  I am going to do a separate entry on some stuff I picked up assembling the thing.  I learned a lot in the process, and I'll cover that later.  But for now, here is what I have.

I have the sides built, top on, treads added, and obviously, have the interior done. I built the model so that the doors open so you can see the details I painted in the interior.  I thought I would be half done when I was complete with the interior walls section of the model- everything else looked like it was just big, wide, flat surfaces that would easily be painted.  It was the details that were going to take all the time, and those were all on the inside, right?

Yeah no.

Port side door closed!
I really discounted how much work painting the treads would be.  I'm also not using an air brush to paint the outside, which would probably save me a ton of time.  In any case, I now consider myself about halfway done.  I will need to do detail work on the exterior as well as get the weapons assembled and painted... but we'll see.  I figure I'm probably on hour ten or eleven on this project.  Will I be done at hour twenty or twenty two?  We'll see.  And if so, how cool will it be at that point?

 So what do I have going on here?  Well, first, as I said, I have it set up so the doors open and close. You can build your Land Raider so that all the doors are glued shut, but I knew I was planning on painting the inside details when I started that project, and just had to hope the doors were cool.

Port side door open!  And you can see the computer station
inside the Land Raider itself!
The doors are very, very cool.  The port side doors slide back and forth.  There are blocks to keep them from sliding too far apart and blocks in the middle of their track, both on the top and bottom, that make the doors come together in the center.  It looks cool.  The *really* cool door though, is the main hatch up front.  Again, you can glue it together.  If you don't, there is a little turning lever assembly that connects to the posts that the the front doors are attached to.  The way the assembly works is that as one door is opened, the other door will open as well.  It is *really* cool.

I put some close combat knife bits on the rack inside the
forward hatch.
The Land Raider doors are too small for any space marines to actually stand inside of. You could slide them in horizontally.  And the cool thing about the Land Raider is that it actually looks like it is tall enough for some Space Marines models to fit inside of the thing. Some one who wanted to do a *really* awesome interior could get a few of them standing inside, receiving final orders and assembling their gear.  Or someone could put a little map table inside of a Land Raider, as the cable is completely empty.  It being empty does make it possible to see the details painted on the walls through the doors, however.

You can kind of see the engine wall in the back of the
Land Raider cabin in this shot- hard to get enough
light in there AND get the camera lens in the right place
but I think you get the idea. 
I still need to finish the following steps to complete this project:

  1. Finish the exterior paint blocking.
  2. Paint the door covers
  3. Paint and assemble the weapons
    1. forward chain gun
    2. side guns (I'll be doing the hurricane bolters)- two sets of these. 
    3. top mounted multi melta
  4. Paint and assemble the other bits
    1. portal covers
    2. smoke can launchers
    3. flood light
    4. communications array
    5. etc.
  5. detailing the exterior
    1. paint all the rivets 
    2. clean up detailing
    3. etc.
I am not planning on doing weathering right now.  I want to practice on another model first, and then apply it to this one.  I could do it right, but I don't want to risk screw this up.  So the weathering step is on the to do list.  Like getting better photo resources. 

And that is where I am right now.  I'll write again when there is news to post. 

Until next time,

David D. 

Thursday, February 9, 2012

Land Raider, cont'd...

Left side!
Work continues on the Land Raider.  I've probably put another 3 hours in on this guy, bringing my total up to 6 thus far.  I have the two interior side walls more or less complete.  My painting skill isn't going to win me a Golden Demon award anytime soon, but I'm pretty happy with how everything is looking.  Here is what I have going on. 

Here you see the left side.  You can click on the pictures to make them appear much larger, which helps to the smaller specifics.  I apologize in advance for the imperfect focus.

In any case, moving from left to right, here is what I've used for the painting.  All these paints come from the Citadel paint line (I have really sold my soul, or rather, hobby money to these people.  But this path to perdition is paved with pleasure.) I've got boltgun metal on the rack in the front with chain mail highlights, chain mail on the metal bar running top to bottom with mithril silver rivets and highlights.  The conduit and light are boltgun metal with chain mail and mithril highlights.  The red light it blood red beneath red gore.  The compartment door has a tallarn flesh foundation below bleached bone.  The edge around it was washed with badab black to make it stand out. The seats are calthan brown as a foundation with bestial brown on top.  The footlockers (and all of the rivets over the background, which is shadow grey) is spacewolves grey.  The alarm light on the top of the middle column is boring blazing orange over the black primer.  The cross speaker is shining gold washed with ogryn flesh, a brown wash.  The computer screen is black with a scorpion green freehand graphic of a guy and text around him, which is actually my favorite part of this section.  The data jack is boltgun metal with chainmail highlights.  The center of the data jack opening is blood red with red gore on top.  The second set of seats is the same as the first. 

Right side!
The right side is also pretty cool.  From right to left, I've got computer keys painted in dark flesh, (I needed a new color for computer keys and it looked good.  The left and right arrow keys are blazing yellow, and the button between them is boltgun.  The conduit data jacks below them are boltgun metal with mithril silver highlighting.  The metal bar is chainmail with mithril silver rivets and highlighting.  The conduit and metalic box is boltgun with chianmail and mithril highlights.  The compartment door is identical to the one of the other side; tallarn flesh foundation below bleached bone for the skull, and badab black wash on the edge. The seats on this side are the same as the other side.  The alarm light is also orange, and the cross speaker and skull are the mirror the other side.  In the little alter, I've got talaran flesh for a foundation, dwarf flesh and then skull white.  I also free handed some black script to look like a blessing.  On the sides I have two candles with shining gold and mithril silver highlights, and the candles are golden yellow and little flames have been plaints on top in blazing orange.  The rest of the side are identical to the other.

So that's the yield of another 3 hours of work.  And we're up to six hours total on this project.

Until next time,

David D.

Wednesday, February 8, 2012

Starting work on the Land Raider...

Here we go!
 Ok, I've done a total of 27 space marine infantry figures thus far.  That is sanding down mold lines, priming, assembling, gluing, holding while the glue sets, painting, second coat-ing, washing, detailing, and second coat detailing, over two dozen little guys.  And I still have more to do.  But I needed to do something else because I have gotten really, really, REALLY bored worked on little people.  Good thing I had a land raider crusader/redeemer sitting on the shelf waiting to be worked on, because it is exactly the kind of thing I was up for working on.  So I am.  I figure this is going to take me about 20 hours to do, which means it could take me two or three weeks to finish, depending on how busy I am.  I would love to see my complete kick ass looking land raider right now, but its a labor of love, and the more time I spend on it during painting and construction, the more I'm going to get out of it when its finished.  And here on the blog I'll document the progress of the project.

Ok.  The Land Raider Crusader/Redeemer is one of the biggest models there is in Warhammer 40K, and possibly the biggest model for the entire space marines army.  It clocks in at 124 parts- the Storm Raven Gunship for the Blood Angle Space Marine faction, which is probably the vehicle closest in size to the land raider, has 116 pieces.  In game play, the Land Raider Crusader gives me 12 Strength 4, armor penetration 5, twin linked (meaning you get to roll twice to hit) shots from the side mounted storm bolters that shoot 24 inches.  The top mounted assault cannon gives me a 4 strength 6, armor penetration 4, twin linked shots.  It can carry 16 infantry figures who can assault on the same turn the disembark.  It has armor of 14 all the way around.  Right out of the box, before you add any additional weapons such a multimelta to kill other vehicles, this thing is fast moving, enemy infantry shredding, moving fortress bar none.  I plan on throwing my terminators inside and just demolishing the armies of my foes.  Hordes of cheap orks or necrons?  Bring 'em on.  But first I need to build the thing.

Its gonna take me a while to get this all put together.
As I said, this thing has a *ton* of pieces.  Here are the sprues untouched, just out of the box.

Yeah.  That's almost as many items as were in the entire Assault on Black Reach Warhammer 40K starter kit.  I love seeing all these pieces though.  It reminds me of when I was a kid and got the Lego Blacktron Message Intercept Base for my 9th birthday.  There were sooooo many little bags of lego pieces to put together.  That thing was HUGE.  I remember that it took me 5 hours to put it together.  I *loved* that toy.

Well, as my mother always said, "the bigger the boy, the bigger the toy."

This thing isn't going to be done in 5 hours.

First step, wash off the sprues.  Its a pretty standard step.   I want to get all of the oils and whatnot off of the plastic before I start going to work on it.  I want the primer and paint and glue to go on without any problems, and I don't want any little bumps or ridges screwing up the pieces or the fittings between them. Little soap, little water, little kitchen sponge action, little drying off, we done.  There were a few parts with little crevices where water had beaded up and I couldn't reach it with a towel, so I let the sprues air dry for about an hour before I applied the spray on primer.

I've done enough blogging about my priming and I think you all get the picture.  It took me a while to prime everything, flip it over, and prime it again, and let it all dry.  There are six separate sprues in the package, and my spray paint box was only big enough to spray two at a time, so I would spay them out, wait ten minutes, flip the two I was working on over, do them again, wait ten minutes, take the finished ones off and put the new ones on, and repeat.

A detailed section of the inside of the Land Raider.
Based on my work on my rhino space marine transport, I have decided to work on several pieces of this project while they are still on the sprue instead of cutting everything out and working on them seperately.  I decided to do this for a few reasons.  First of all, it makes it much harder to misplace any of the pieces.  With 124 parts, and some of them very small, its easy for something, such as the instructions, a painting book, the paper towel I use to clean of my brushes, etc, to cover up a piece, which results in my wasting time looking for something, and its kind of a buzz kill.  Second of all, keeping the pieces on the sprue makes it very easy for me to paint the pieces and move the 'em around to get the bast light and painting angle without ever having to touch the piece itself.  Less smudging is better.  Third, it cuts down on items getting knocked around, scratched or otherwise banged up.  So hey- I'll see how it goes. I know it'll mean that I need to repaint the places where the pieces connect to the sprue after I sand down the connection spots after I clip the pieces out.  I'll have to see if it is worth the hassle.

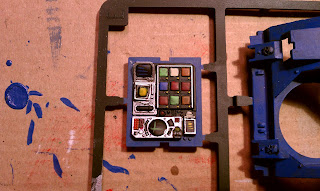
One last pic before I end this entry.  This picture shows a computer counsel that will also be on the inside of the land raider.  The instructions call for constructing the land raider from the inside out; its pretty much impossible to paint the interior once the the model has been constructed, so I need to work on detailed parts like this now.  The rest of the model, while big, isn't especially detailed, at least not in comparison to the interior of the raider.  I bet at this point I have put in about 3 hours of out and out work, not waiting for something to dry work, on this thing.  And I keep working on it.  I'll have more photos soon.

Until next time,

David D.