Work on the Land Raider is almost done! I'll have a full post soon, but until then, here are some pictures to enjoy while you wait.
David
I am an adult male who is married, educated and has a professional career. In my spare time, I enjoys building, collecting and customizing toys, miniatures and models as a hobby. This is my blog.
Showing posts with label project progress. Show all posts
Friday, February 24, 2012
Its ALIVE!
Thursday, February 16, 2012
Progress On The Land Raider
I have made some progress on the Land Raider since my last post on it. Lots to cover.
First of all, this thing is cool as hell. The photos aren't perfect- getting a camera stand, some decent lighting and whatnot is on my to do list- but even if it doesn't look bad ass in the pictures, it is when you look at it in person. This thing just kind of grows in aspects and areas of coolness as it is assembled and painted the way a town in the old game SimCity does. At first, its just look little piece of this, cool little part of that, then it gets bigger, and you're like, hey, I'm cooking now. And then you do a little more, and its three times cooler than it was before. And you do a bit more work, and suddenly, its twelve times cooler. And before you know it, you've spent six hours on the thing and you have an airport and a sports stadium and no crime and 100% fire coverage and the best road and mass transit system going ever and you look down on your little creation and you think, damn... I made that!
Right now, I'm nearly done with the color blocking of the outside. I used a thick brush to get the big sections of things with two layers of ultra marine blue, and need to go in with smaller brushes to get in the nooks and gaps. I am going to do a separate entry on some stuff I picked up assembling the thing. I learned a lot in the process, and I'll cover that later. But for now, here is what I have.
I have the sides built, top on, treads added, and obviously, have the interior done. I built the model so that the doors open so you can see the details I painted in the interior. I thought I would be half done when I was complete with the interior walls section of the model- everything else looked like it was just big, wide, flat surfaces that would easily be painted. It was the details that were going to take all the time, and those were all on the inside, right?
Yeah no.
I really discounted how much work painting the treads would be. I'm also not using an air brush to paint the outside, which would probably save me a ton of time. In any case, I now consider myself about halfway done. I will need to do detail work on the exterior as well as get the weapons assembled and painted... but we'll see. I figure I'm probably on hour ten or eleven on this project. Will I be done at hour twenty or twenty two? We'll see. And if so, how cool will it be at that point?
So what do I have going on here? Well, first, as I said, I have it set up so the doors open and close. You can build your Land Raider so that all the doors are glued shut, but I knew I was planning on painting the inside details when I started that project, and just had to hope the doors were cool.
The doors are very, very cool. The port side doors slide back and forth. There are blocks to keep them from sliding too far apart and blocks in the middle of their track, both on the top and bottom, that make the doors come together in the center. It looks cool. The *really* cool door though, is the main hatch up front. Again, you can glue it together. If you don't, there is a little turning lever assembly that connects to the posts that the the front doors are attached to. The way the assembly works is that as one door is opened, the other door will open as well. It is *really* cool.
The Land Raider doors are too small for any space marines to actually stand inside of. You could slide them in horizontally. And the cool thing about the Land Raider is that it actually looks like it is tall enough for some Space Marines models to fit inside of the thing. Some one who wanted to do a *really* awesome interior could get a few of them standing inside, receiving final orders and assembling their gear. Or someone could put a little map table inside of a Land Raider, as the cable is completely empty. It being empty does make it possible to see the details painted on the walls through the doors, however.
I still need to finish the following steps to complete this project:
![]() |
And this is what it looks like before I even add the weapons. |
First of all, this thing is cool as hell. The photos aren't perfect- getting a camera stand, some decent lighting and whatnot is on my to do list- but even if it doesn't look bad ass in the pictures, it is when you look at it in person. This thing just kind of grows in aspects and areas of coolness as it is assembled and painted the way a town in the old game SimCity does. At first, its just look little piece of this, cool little part of that, then it gets bigger, and you're like, hey, I'm cooking now. And then you do a little more, and its three times cooler than it was before. And you do a bit more work, and suddenly, its twelve times cooler. And before you know it, you've spent six hours on the thing and you have an airport and a sports stadium and no crime and 100% fire coverage and the best road and mass transit system going ever and you look down on your little creation and you think, damn... I made that!
![]() |
Instead of a door, there is a space marine supply cupboard in the door frame here. Um... Why don't they just keep all that stuff inside the Land Raider proper? |
I have the sides built, top on, treads added, and obviously, have the interior done. I built the model so that the doors open so you can see the details I painted in the interior. I thought I would be half done when I was complete with the interior walls section of the model- everything else looked like it was just big, wide, flat surfaces that would easily be painted. It was the details that were going to take all the time, and those were all on the inside, right?
Yeah no.
![]() |
Port side door closed! |
So what do I have going on here? Well, first, as I said, I have it set up so the doors open and close. You can build your Land Raider so that all the doors are glued shut, but I knew I was planning on painting the inside details when I started that project, and just had to hope the doors were cool.
![]() |
Port side door open! And you can see the computer station inside the Land Raider itself! |
![]() |
I put some close combat knife bits on the rack inside the forward hatch. |
![]() |
You can kind of see the engine wall in the back of the Land Raider cabin in this shot- hard to get enough light in there AND get the camera lens in the right place but I think you get the idea. |
- Finish the exterior paint blocking.
- Paint the door covers
- Paint and assemble the weapons
- forward chain gun
- side guns (I'll be doing the hurricane bolters)- two sets of these.
- top mounted multi melta
- Paint and assemble the other bits
- portal covers
- smoke can launchers
- flood light
- communications array
- etc.
- detailing the exterior
- paint all the rivets
- clean up detailing
- etc.
I am not planning on doing weathering right now. I want to practice on another model first, and then apply it to this one. I could do it right, but I don't want to risk screw this up. So the weathering step is on the to do list. Like getting better photo resources.
And that is where I am right now. I'll write again when there is news to post.
Until next time,
David D.
Labels:
Land Raider,
painting,
project progress,
Warhammer 40K
Thursday, February 9, 2012
Land Raider, cont'd...
![]() |
Left side! |
Work continues on the Land Raider. I've probably put another 3 hours in on this guy, bringing my total up to 6 thus far. I have the two interior side walls more or less complete. My painting skill isn't going to win me a Golden Demon award anytime soon, but I'm pretty happy with how everything is looking. Here is what I have going on.
Here you see the left side. You can click on the pictures to make them appear much larger, which helps to the smaller specifics. I apologize in advance for the imperfect focus.
In any case, moving from left to right, here is what I've used for the painting. All these paints come from the Citadel paint line (I have really sold my soul, or rather, hobby money to these people. But this path to perdition is paved with pleasure.) I've got boltgun metal on the rack in the front with chain mail highlights, chain mail on the metal bar running top to bottom with mithril silver rivets and highlights. The conduit and light are boltgun metal with chain mail and mithril highlights. The red light it blood red beneath red gore. The compartment door has a tallarn flesh foundation below bleached bone. The edge around it was washed with badab black to make it stand out. The seats are calthan brown as a foundation with bestial brown on top. The footlockers (and all of the rivets over the background, which is shadow grey) is spacewolves grey. The alarm light on the top of the middle column is boring blazing orange over the black primer. The cross speaker is shining gold washed with ogryn flesh, a brown wash. The computer screen is black with a scorpion green freehand graphic of a guy and text around him, which is actually my favorite part of this section. The data jack is boltgun metal with chainmail highlights. The center of the data jack opening is blood red with red gore on top. The second set of seats is the same as the first.
![]() |
Right side! |
So that's the yield of another 3 hours of work. And we're up to six hours total on this project.
Until next time,
David D.
Labels:
Land Raider,
painting,
project progress,
Warhammer 40K
Wednesday, January 25, 2012
The first squad thus far
I know, I know... I'm late with an update and I didn't even have the courtesy to do a "sorry, going to be late" post. Apologies. Its end of semester for J Term, and I had two papers due this week. I've got a ton of pictures of 40k stuff I have been working on between reading passages, taking notes, and putting my papers together, and will get some of those up hopefully this weekend. In the meantime, here is a picture of what the army that I started painting in the last post looks like at the moment.
Until next time,
David D.
Tuesday, December 27, 2011
Head Shot
![]() |
The figure is looking pretty good. |
The good news is, I should have had more faith.
But I didn't know that when I started out this evening, so I avoided work on the face by doing touch up work on all the other parts- used the tiny brushes to really get the lines down on the rest of the pieces to get my ready to work on the head. When everything else looked pretty good (and there was really nothing else left to do... at all...) I decided it was time to attack that face.
![]() |
Hair is Folk Art 479 Pure Black by Plaid. Skin in Elf Flesh by Citadel. |
Time to man up and get to it.
![]() |
Eyes over painted! |
![]() |
Eyes cleaned up. |
![]() |
The face is looking not too horrible. |
I tried using the 'tap' technique to get the dark spots in the middle of the eyes a few times, but I just was not getting enough paint exactly where I wanted it to make much of a mark on the eyes using my paint brushes. The dots were very, very light. Over the white eye paint, they looked like faint grey spots that practically blended in with the rest of the eye I didn't want to tap the brush too hard, because I thought it would end up making a black spot on the face which would undo everything I had just accomplished. But then I got an idea- how about putting paint on the end of an unbent paper clip? I grabbed a paperclip out of my desk, pulled it straight, and popped it into the paint.
Guess what?
Paper clips make excellent iris painting tools.
![]() |
Hobby tool of the day: the light up magnifier. |
So where I am now is this figure is pretty close to done. I want to get some rest and take a look at it tomorrow to see what touching up may need to be done, and then I need to reassemble the figure. But for my first try, I think this thing looks great. Sure it could be better- I could have come up with some additional colors for the face and done some layering. I may also do a dark wash to add some shadows, but I'm not sure. I'm so happy with how things look at the moment I think I may decide to quit while I'm ahead and try those techniques on the next figure painting project. You'll see what I decide soon.
Until next time,
David D.
Labels:
action figure,
custom,
painting,
problem solving,
project progress
Monday, December 12, 2011
Figure Painting, Part 1
black coat over black primer, white dry brushed, and now a few layers of medium gray paint over everything else. |
I wish I had taken more pictures of everything as I was doing it, but I was too engrossed in the act of painting to step back and stop to take pictures of each phase. Next time.
After I got done with the dry brushing, I moved on to painting a darker gray onto the areas of the figure that I meant to end up gray- the body armor, gloves, boots, pockets, etc. That went pretty well. I am using Folk Art acrylic paints from Plaid. I use their paint because it comes in a ton of colors, its super inexpensive ($0.79 per 2 ounce bottle) and it seems to be good quality stuff.
One principle I saw in practice while painting the gray was color vs. coverage. This idea is covered on page 50 of How To Paint Citadel Miniatures, and the idea is this: when it comes to paint, there is a trade off between the brightness of colors and their capacity to cover a surface in a single coat. Some paint is made to cover objects in one or two coats. In this case, the colors tend to be dull. On the other hand, paints can be formulated to have bright colors, but in order to achieve these colors, several coats may need to be applied, as each individual coat is relatively translucent. The former type of paint was the factor with the gray. After two coats, it didn't look very impressive, but after four, it looked amazing.
on the left we have the medium gray, and on the right we have steel gray on top of the medium gray. Steel gray is kind of like barely dirty mob bucket water gray. |
The darker gray does give the illusion of shadows in the folds and recesses of the shape, but the really light color of the gray doesn't look good at all; it really isn't what I want. I'm not sure at this point what to try next. Maybe I should repaint the parts where I used the steel gray on with the medium gray, and try to find a gray paint that is closer to medium gray in darkness but still a little bit lighter than the medium gray.
I am looking at the Plaid colors online as I write this, and it looks like there several grays in the spectrum I could purchase, and the steel gray swatch on the website looks much whiter than the bottle I have here. That makes sense. I think my next step will be to run to the store when I can and grabbing battleship gray and dark gray, and doing some experimenting with dark gray, battleship gray and medium gray. Based on how those look, I'll make a choice about what paints I want to use going forward.
Ok- so that's the plan. Find those other colors at the store and report back to the workshop when I have time. More news as it happens.
Until next time,
David D.
Labels:
action figure,
custom,
learning,
painting,
project progress
Sunday, December 4, 2011
Action Figure Painting Project: Everything Prior to Actually Priming
Ok! Well, finals were over this week, and this weekend, I've had a chance to get back to work on my hobby. How To Pain Citadel Miniatures says that you can go with either a black or white primer. According to the book, black is good for making the painting process go faster, while while is good for master painters and makes bright colors show better. The black makes shadows look better.
I went with a black primer base primer. I could be wrong, but I think it'll be easier to get the shadow effects I would like on the finished product if I start with the black, instead of painting it white, than doing a dark second coat and THEN painting the real colors I want on top of that dark coat on top of the primer. According to the book, I can also get a good shadow effect using dark washes over the final layer of color, but I am trying to keep this first figure relatively simple. I'm ruling out washes for this project.
But I'm getting ahead of myself. Lets step back.
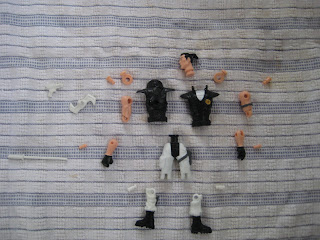
Before you can put on the primer, you need to disassemble the figure into its component pieces.
Check.
Next you need to sand down potential rub spots so that once you put your paint on the figure, the paint won't run itself off.
Done.
Note. According to the book I should have also performed a check of all the mold seams on the figure pieces. If I found anything that I could detect by running a fingernail over it, I needed to sand it down. I did not actually end up doing this step thoroughly, and yes, after I sprayed on my first layer of primer, I did notice several huge plastic seams.
Agh!
Oh well. But what I want to get to is the painting phase. Looking forward to actually painting has been what has got me thought all the pages and pages of papers I have had to write for my finals last week. Its my first figure that I'll be painting since getting a clue as to how to do it. I'll let the seam thing slide.
The clean water burns! It BURNS! |
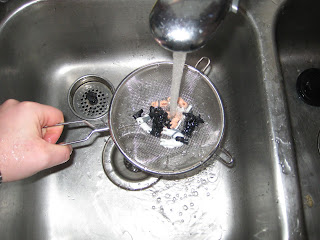
Ah-ha!
Best get cracking on that one!
So I did. With the use of standard hand colander, I got the figures good and rinsed in the kitchen sink. I didn't want to risk the joint pegs getting lost down the drain, so I didn't bounce the pieces up and down in the water- I just smoothly moved them around under the water to get everything nice and soaked. I couldn't see any residue on the pieces to begin with, so I wasn't worried about very aggressive washing. Next I put the pieces on a towel to dry on the porch. We have a door between the porch and the rest of the house, so I didn't need to worry about our two cats, Boots and Dora, getting to the pieces, deciding to knock them around as they do everything that isn't bolted down, and making sure my dream project ends up a nightmare.
So close to the painting step I can barely stand it. |
According to the spray paint instructions, you need to paint in a place that is well ventilated and where the temperature is at least 50 degrees Fahrenheit/10 degrees Celsius.
What I did over the summer is spray paint stuff out in the garage, where there was plenty of fresh air and air flow when I had the doors open. We live in a house built in 1947 or so, and the garage is detached. Thus, there are no problems with fumes getting into the house.
Now that winter is here, I want to use the porch as my spray paint studio. Its a good 3 season space. One of our home's previous owners installed a nice heater there, and there are windows that open to let in the air from outside. My plan was to spay paint the work pieces using the cardboard spay paint enclosure I built for previous projects while I had the heater on, and after 75 minutes or so (the amount of time it takes for the primer to dry) open up the window and get the fumes out. This seemed to be a great idea until my wife looked at the warning label for the primer.
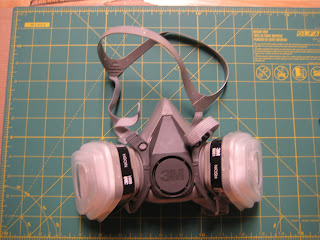
The new mask. ::hooooo-pah:: ::hooooo-pah:: What is thy bidding, my masta? |
Because I am a smart effing husband, I said "Yes Dear" and ran to the hardware shop, where I bought a really, really hard core, professional grade painting mask. I put it on and looked in the mirror. I look like something out of a Hollywood movie with this thing on. I need to incorporate it into a Halloween costume at some point. Anyway, I grabbed the mask and sealed the door between the house and the porch. I turned on the heater to get the porch warm enough to paint the pieces and waited for the porch to warm up.
This cardboard once package a toy. Soon, it will find a new use as a platform for items to be painted to be place upon. |
At this point someone could accuse me of ceding all decision making authority on this project to Rick Priestley, author of How to Paint Citadel Miniatures. Those people would be right. I absolutely have. I am not just my wife's bitch, or as I like to think of it, a smart effing husband, I'm game workshop's bitch as well. But I am cool with that. When it comes to painting figures, I want lots and lots of instruction until I know what I am doing. At that point, I'll start doing my own thing.
The spray enclosure. Don't spray paint anything without one. |
In about 10 minutes, the porch heater got the porch warm enough to paint. I got the paint enclosure set up, put down one of my newly cut cards in the enclosure, and put the pieces on the card. I spray painted two light coats of black primer on the figures, and things look good so far. Moving the card to adjust the angle at which I could spray the work pieces worked out fantastically. I took a few pictures, but it is dark at this point and the lighting on the porch is bad, so no pictures of that is going up yet. I will take some pictures tomorrow and post them then. I'm happy with how things are going so far.
That's the logical conclusion of this update, so I'll call it quits here.
Until next time,
David Draper
Labels:
action figure,
custom,
painting,
project progress,
spray paint
Tuesday, November 29, 2011
Old Man Dremel Has Come And Gone
Woot! Just got done with the first draft of a 15 page paper due Friday. The best way to keep myself going was to tell myself that when I was done with this draft, I would let myself update the blog.
This latest step was actually really easy and really fast. The step I am referring to is the "sanding down the rub spots" step. Last time I finished taking the figure apart. This time I want to dremel down the parts of the figure that could rub against each other when it is put back together. Sanding those surfaces will keep friction from taking the paint off, leaving ugly scar marks on the figure.
In order to complete this step, I used my Black and Decker dremel that I picked up from Target, two different sanding tools (more about this later), and a mask to cover my mouth and nose. I just grabbed the instructions for my dremel tool, er, "Rotary Tool", since it was made by Black and Decker and I think Dremel is tradmarked by the company that makes Dremels, and it looks like the 'sanding tools' are actually cutters. Hmm.
My grandfather, who was a wiz with tools, and according to my mother, always said that "you need to use the right tool for the job", is probably rolling over in his grave. But what can I say- I'm learning this as I go, and didn't break anything, so I'm still calling this stage a qualified success.
There were 6 items to sand: the 2 shoulder joints, the 2 elbow joints, and the 2 knee joints. I started with the shoulders and got use to the fact that breathing in the mask fogged up my glasses. I tried adjusting the nose of the mask to minimize this.
I used the more coarse of my two cutting tools turn sanding tools, and used the lowest speed on my dremel, er, rotary tool.
I am going to get the hang of this. Just you watch.
Based on my first experience with the rotary tool (natch), I learned that on the high setting, the cutting tool will cut through of action figure plastic like tear gas on through a Black Friday shopping mob. Thus, I made sure I was on the lowest speed, because I don't want to destroy my work pieces. I had no problems with the shoulder and elbow sections. I rotary tool'ed (the verbing of America at work) 'em down just a little. At the lowest speed, this took about 4 passes per area I was sanding down to get the joints the way I wanted them.
The knee joints were a little different. As I mentioned above, the bit I used with the more coarse cutting bit of the two I have. The plastic on the leg section of the action figures seemed to be different than the plastic on the arms, because instead of just sanding off, the tool left small, ugly, rough scars on the plastic. I switched to the finer cutting bit to see if it would make and difference and kept the rotary tool speed on low. That did the trick- no more scars on the plastic, and it was sanded down just a bit, just like the arm sections were.
As I said at the top, this was a really fast step. The rotary tool did kick up some plastic dust, so I was glad I had my mask on. I don't know what happens if you breath plastic dust, but I bet it isn't good for me. I didn't use goggles, although I have some and it probably would have been smart of me to do so. I figured my glasses would protect my eyes well enough, which is probably exactly what every guy with glasses thinks just before they have a horrible power tool accident that robs them of their sight.
Because I am my grandfather's grandson, I know I need to take care of my tools. One handy tip I learned during the great Build-A-HQ project is that a toothbrush is a great way to get plastic dust off of scoring knives and other tools. I got that suggestion from another hobbyist website, but for the life of me, I cannot remember which one. If I do remember, I'll post the credit for it. The idea wasn't mine. In any case, that toothbrush technique works great for getting the plastic dust off of rotary tools as well. There wasn't a ton of dust in and on the tool, but I want my tools to be good for me, so I figure I should be good to my tools. It only about 20 seconds of brushing to get everything cleaned up anyway. Once everything was cleaned up, I put it all away.
I am still a little miffed about my using "cutters" to do something that it sounds to me like they are not designed to do. As much as I would love to be a handyguy, I am about as far from one as a guy can be. Is there a better bit to use with a rotary tool for sanding down plastic? I'll have to check this out. Am I more concerned about this than I should be? Without a doubt. But I would like to be using the right tool for the job.
The next step will be washing everything off and putting a base coat of paint on. I plan on using black spray paint for the base coat, since according to my master text, black base coats make it easier to get shadows to happen in your miniatures. I have one other copy of the same figure; I may do that one in a white spray paint base coat (which the book recommends for minutes that will be painted in bright colors) to contrast how the base coat impacts the final look of the figure. The master text also has some other great suggestions about how to do the spray painting of the base coat, but I'll leave those suggestions for the next blog entry.
So! Painting is on the agenda for next time. Painting. My favorite activity. Wish me luck.
Until next time,
David D.
The gang is all here! Everything I needed for this step is in this shot. |
In order to complete this step, I used my Black and Decker dremel that I picked up from Target, two different sanding tools (more about this later), and a mask to cover my mouth and nose. I just grabbed the instructions for my dremel tool, er, "Rotary Tool", since it was made by Black and Decker and I think Dremel is tradmarked by the company that makes Dremels, and it looks like the 'sanding tools' are actually cutters. Hmm.
My grandfather, who was a wiz with tools, and according to my mother, always said that "you need to use the right tool for the job", is probably rolling over in his grave. But what can I say- I'm learning this as I go, and didn't break anything, so I'm still calling this stage a qualified success.
The coarse cutting bit in action. |
I used the more coarse of my two cutting tools turn sanding tools, and used the lowest speed on my dremel, er, rotary tool.
I am going to get the hang of this. Just you watch.
Based on my first experience with the rotary tool (natch), I learned that on the high setting, the cutting tool will cut through of action figure plastic like tear gas on through a Black Friday shopping mob. Thus, I made sure I was on the lowest speed, because I don't want to destroy my work pieces. I had no problems with the shoulder and elbow sections. I rotary tool'ed (the verbing of America at work) 'em down just a little. At the lowest speed, this took about 4 passes per area I was sanding down to get the joints the way I wanted them.
The fine cutting bit in action. |
As I said at the top, this was a really fast step. The rotary tool did kick up some plastic dust, so I was glad I had my mask on. I don't know what happens if you breath plastic dust, but I bet it isn't good for me. I didn't use goggles, although I have some and it probably would have been smart of me to do so. I figured my glasses would protect my eyes well enough, which is probably exactly what every guy with glasses thinks just before they have a horrible power tool accident that robs them of their sight.
Keeping the tools clean. |
I am still a little miffed about my using "cutters" to do something that it sounds to me like they are not designed to do. As much as I would love to be a handyguy, I am about as far from one as a guy can be. Is there a better bit to use with a rotary tool for sanding down plastic? I'll have to check this out. Am I more concerned about this than I should be? Without a doubt. But I would like to be using the right tool for the job.
The next step will be washing everything off and putting a base coat of paint on. I plan on using black spray paint for the base coat, since according to my master text, black base coats make it easier to get shadows to happen in your miniatures. I have one other copy of the same figure; I may do that one in a white spray paint base coat (which the book recommends for minutes that will be painted in bright colors) to contrast how the base coat impacts the final look of the figure. The master text also has some other great suggestions about how to do the spray painting of the base coat, but I'll leave those suggestions for the next blog entry.
So! Painting is on the agenda for next time. Painting. My favorite activity. Wish me luck.
Until next time,
David D.
Labels:
action figure,
custom,
project progress,
rotary tool
Sunday, November 27, 2011
Step One Complete
Hey folks. Its been a busy Thanksgiving week and weekend. My best friend Matt came to town. He is a resident doc at a Big Deal hospital on the East Coast. He and I met in college, and despite being one of, if not the smartest people I have ever met, he is completely down to earth and cool. He is a giant video game nut and we spent plenty of time (when we weren't stuffing ourselves silly with too much food) on the playstation, hanging out, and just having a good time. It was great. I hope you all had a good Thanksgiving too if you celebrate it, or a good "lets celebrate the help that the native peoples gave starving strangers in a strange land, only to have those strangers decided to take over and kill the people who helped them" weekend, or, if you are not from the USA, a good "oh jeez, those crazy Americas are getting even fatter this weekend" weekend.
Oh shoot! All my fellow readers from the USA are gone!
Anyway, for the 30% (now 100%!) or so of the readers from outside the USA still here...
First announcement- my wife Laura, Matt and I ran to the mall at some point this weekend. Laura picked up a present for me: Acrylic Painting for Dummies. I'm a huge fan of the For Dummies series. I've gone through at least a dozen of their books for IT related stuff, including Excel 2003 for dummies, Networks for Dummies, PCs for Dummies, Photoshop for Dummies, TCP/IP for Dummies, Unix for Dummies, etc. They are great books written for beginners but have a tremendous amount of information in them and can serve as great references later on. Each chapter is pretty well self contained, so you can skip the sections you aren't interested in reading or don't need to read without screwing yourself later on. I would love to take some classes on acrylic painting to learn some brush techniques and just general tips about painting, but what I have found doesn't really fit into my schedule. We have an extensive community ed program in St. Paul, MN where I live, but the classes tend to be at night, and I already go to school at night, or, since I work as a life skills worker with teen guys, tend to have my client sessions at night, and thus, those classes don't work. Between Acrylic Painting for Dummies and the book mentioned grabbing in my last post, How to Paint Citadel Miniatures, I think I'll be able to teach myself plenty in the weeks ahead. It makes me feel like I'm going to have the know how to pick up my figure painting game and make some progress detailing my figures.
Yeah, that was a pretty intensely dorky sentence. Moving on to the real meat of the update.
So where am I with the current project?
Revisions with the master plan have already taken place. I was originally planning on dremeling down the rub zones, such as the knee, shoulder and elbow joints, on the figure, and then taking it apart. Well, I tried that but the dremel had a hard time getting the joints without rubbing on the rest of the figure. I didn't do much damage, but I noticed that things were not going according to plan.
So an alteration is in order:
Old:
1. dremel down the the rub points in the shoulders, elbows, hips and knees.
2. disassemble the figure, including removing the lower legs/arms from the upper legs arms through the use of a hair dryer.
OUTDATED. DELETE OBSOLETE INSTRUCTIONS. OVERWRITE.
New:
1. disassemble the figure, including removing the lower legs/arms from the upper legs arms through the use of a hair dryer.
2. dremel down the the rub points in the shoulders, elbows and knees.
INSTRUCTIONS UPDATED.
PLAN ALTERATION COMPLETE.
The good news is that it is really, really easy to take apart action figures from The Corps line. A single screw in the back holds the figure together. That screw is easily reached by a Phillips head screw driver (sorry, don't remember the size, but it isn't an exotic gauge or incredibly small or anything like that- I had the right sized screw driver in my work bench.) Once the screw is removed, the front and back torso of the action figure come apart, and the waist, arms and head are easily removed. Besides the screw itself, there are no other methods of fastening the figure together. No body cracking with a vice like you evidently need to do with modern GI Joe figures is necessarily, which is kind of nice. The less opportunity for screw ups, I think, the better I will do at this point.
At the same time, this level of disassembly does not make it any easier to actually dremel down the knee, elbow or shoulder joints. More work needs to be done to separate those parts.
Thankfully, I have done enough research about taking action figures apart to know there are two good and worthwhile methods to use here: either heat a joint with a hairdryer or put the pieces in a cup of water that has been in the microwave for a minute or so. Because it seemed the hairdryer method would be easier to use if I needed to reheat the plastic, I went with that.
In order to keep from burning my fingers, I used a clothespin to hold the plastic limbs. This kept my fingers from getting fried and allowed me to hold the plastic in front of the hairdryer set on hot for about 60 seconds, which is about what it seemed to take to get the plastic warm enough to pop the various joints. While holding each joint in front of the hair dryer, I slowly turned the limb so that the joint was heated on all sides.
Another tool that helped to pop the joints apart was my Eklind multihex key tool. These are great little tools that can be found for about $2 or $3 at the hardware store. I used the smallest hex key on my foldout set to pry into the spaces of the joint and push the hot, flexible plastic apart. The smallest tool on my kit was 5/64th inch or thereabouts, and the metal on plastic gave me a lot more leverage than I could have mustered using my fingers and fingernails alone.
The key to this step was patience. The plastic is pretty malleable after 60 seconds of hot air from the hairdryer, and I was worried that I could tear it with the hex key if I got too rough. Also, the plastic becomes cool fast. I found that I had a good 20 seconds to work with the plastic after 60 seconds of heating. Using my fingers alone didn't seem fast enough to take the joints apart. If I couldn't get the joints popped in 20 seconds, I applied another round of 60 seconds of hot air to the joints, and tried again.
Eventually, everything worked just fine. I went to school on the first few joints, and applied what I learned to the rest. Each joint in this action figure was held together by a little peg. The pegs had big end and small end, which will be nice later on because when I reassemble the figure, there is only one way for the pegs to be put back into each joint. I learned quickly that trying to pry the small side of the peg from the joint was a much faster way to take the joint apart than by trying the big side or trying to pry both sides at once. In a few minutes, I had all the joints popped apart.
I gotta say, it was pretty satisfying to see Shinto-San all taken apart without any parts broken or other mistakes made at this point. I could have tried to break the figure down even further: the pin joints of the elbows have pegs in them that attach them to the upper arm, allowing the joint to rotate in 3 dimensions, and the hips are connected to the lower torso by peg joints as well. In both of these cases, I didn't think there was much give going on there to pop the joints, and I also didn't think these were vital areas to pop to make painting easier or dremel work look better, so I let sleeping dogs lie.
Because there were so many parts and because my wife and I have two loving, wonderful, sweet, and completely ADHD cats who will play with *anything* they can get their paws on that isn't nailed down, I have put all the pieces of the figure into little compartments to keep them secured. Each of the joint pegs are unique to the joint they fit into, so finding the correct peg for each joint should not be a deal later on, but I still separated the parts by portion of the body. Even without cats, I didn't want to throw all of the parts into a drawer or something; they are small, and I figure the work I am putting into this project make taking a little care of accounting for all of the parts well warranted. I would *hate* to get nearly done with all of this only to realize a forearm or knee joint was missing.
So that is where I am at the moment. Finals are coming up, and I've got a ton of papers to research for and then write, but I hope to have at least all of the rub areas dremeled down and have an update on the project inside of a week. Take care.
Until next time,
David D.
Oh shoot! All my fellow readers from the USA are gone!
Anyway, for the 30% (now 100%!) or so of the readers from outside the USA still here...
When in doubt, read it out. |
Yeah, that was a pretty intensely dorky sentence. Moving on to the real meat of the update.
So where am I with the current project?
Revisions with the master plan have already taken place. I was originally planning on dremeling down the rub zones, such as the knee, shoulder and elbow joints, on the figure, and then taking it apart. Well, I tried that but the dremel had a hard time getting the joints without rubbing on the rest of the figure. I didn't do much damage, but I noticed that things were not going according to plan.
So an alteration is in order:
Old:
1. dremel down the the rub points in the shoulders, elbows, hips and knees.
2. disassemble the figure, including removing the lower legs/arms from the upper legs arms through the use of a hair dryer.
OUTDATED. DELETE OBSOLETE INSTRUCTIONS. OVERWRITE.
New:
1. disassemble the figure, including removing the lower legs/arms from the upper legs arms through the use of a hair dryer.
2. dremel down the the rub points in the shoulders, elbows and knees.
INSTRUCTIONS UPDATED.
PLAN ALTERATION COMPLETE.
Score one for the The Corps action figures: They are easy to take apart. |
My wife's hairdryer to the rescue! |
Thankfully, I have done enough research about taking action figures apart to know there are two good and worthwhile methods to use here: either heat a joint with a hairdryer or put the pieces in a cup of water that has been in the microwave for a minute or so. Because it seemed the hairdryer method would be easier to use if I needed to reheat the plastic, I went with that.
Protect your digits. Don't put them in front of streams of super hot air from hairdryers. Instead, put plastic held by clothespins in front of steams of super hot air from hairdryers. |
Another tool that helped to pop the joints apart was my Eklind multihex key tool. These are great little tools that can be found for about $2 or $3 at the hardware store. I used the smallest hex key on my foldout set to pry into the spaces of the joint and push the hot, flexible plastic apart. The smallest tool on my kit was 5/64th inch or thereabouts, and the metal on plastic gave me a lot more leverage than I could have mustered using my fingers and fingernails alone.
And this little piggy pries plastic joints apart all the way home. |
Eventually, everything worked just fine. I went to school on the first few joints, and applied what I learned to the rest. Each joint in this action figure was held together by a little peg. The pegs had big end and small end, which will be nice later on because when I reassemble the figure, there is only one way for the pegs to be put back into each joint. I learned quickly that trying to pry the small side of the peg from the joint was a much faster way to take the joint apart than by trying the big side or trying to pry both sides at once. In a few minutes, I had all the joints popped apart.
Woo hoo! |
Because there were so many parts and because my wife and I have two loving, wonderful, sweet, and completely ADHD cats who will play with *anything* they can get their paws on that isn't nailed down, I have put all the pieces of the figure into little compartments to keep them secured. Each of the joint pegs are unique to the joint they fit into, so finding the correct peg for each joint should not be a deal later on, but I still separated the parts by portion of the body. Even without cats, I didn't want to throw all of the parts into a drawer or something; they are small, and I figure the work I am putting into this project make taking a little care of accounting for all of the parts well warranted. I would *hate* to get nearly done with all of this only to realize a forearm or knee joint was missing.
So that is where I am at the moment. Finals are coming up, and I've got a ton of papers to research for and then write, but I hope to have at least all of the rub areas dremeled down and have an update on the project inside of a week. Take care.
Until next time,
David D.
Labels:
action figure,
custom,
how to,
learning,
project progress
Subscribe to:
Posts (Atom)