Showing posts with label how to. Show all posts

Wednesday, February 1, 2012

Spraying On Primer Fast And Easy

 This post is just a quick demonstration of the technique I use for priming anything I am working on, be it Warhammer minis, action figures, vehicles, etc.  First I set up everything in my cardboard box spray enclosure, and then I place everything I am going to prime on a square cardboard scrap I've cut from a cardboard box.  I spray everything head on at an angle as close to horizontal as I can, and rotate everything by turning the square scrap 90 degrees, and repeat the process.  Turning the square makes sure I don't touch I'm working on while it is wet, and makes everything go plenty easy.

Everything ready to go, before any primer is applied.
Primer applied to the front. 

Rotate the card to the left 90 degrees...

Spray the objects on their left. 

Rotate the card to the left 90 degrees again... 

Spray your stuff from the back. 

Rotate everything to the left 90 degrees one more time...

And now you're good to go. 

Until next time!

David D.

Sunday, November 27, 2011

Step One Complete

Hey folks.  Its been a busy Thanksgiving week and weekend.  My best friend Matt came to town.  He is a resident doc at a Big Deal hospital on the East Coast.  He and I met in college, and despite being one of, if not the smartest people I have ever met, he is completely down to earth and cool.   He is a giant video game nut and we spent plenty of time (when we weren't stuffing ourselves silly with too much food) on the playstation, hanging out, and just having a good time.  It was great.  I hope you all had a good Thanksgiving too if you celebrate it, or a good "lets celebrate the help that the native peoples gave starving strangers in a strange land, only to have those strangers decided to take over and kill the people who helped them" weekend, or, if you are not from the USA, a good "oh jeez, those crazy Americas are getting even fatter this weekend" weekend.

Oh shoot!  All my fellow readers from the USA are gone!

Anyway, for the 30% (now 100%!) or so of the readers from outside the USA still here...
When in doubt, read it out.
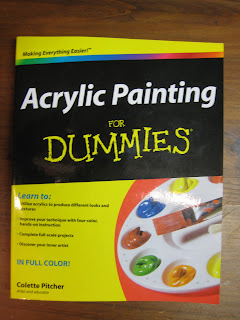
First announcement- my wife Laura, Matt and I ran to the mall at some point this weekend.  Laura picked up a present for me: Acrylic Painting for Dummies.  I'm a huge fan of the For Dummies series.  I've gone through at least a dozen of their books for IT related stuff, including Excel 2003 for dummies, Networks for Dummies, PCs for Dummies, Photoshop for Dummies, TCP/IP for Dummies, Unix for Dummies, etc.  They are great books written for beginners but have a tremendous amount of information in them and can serve as great references later on.  Each chapter is pretty well self contained, so you can skip the sections you aren't interested in reading or don't need to read without screwing yourself later on.  I would love to take some classes on acrylic painting to learn some brush techniques and just general tips about painting, but what I have found doesn't really fit into my schedule.  We have an extensive community ed program in St. Paul, MN where I live, but the classes tend to be at night, and I already go to school at night, or, since I work as a life skills worker with teen guys, tend to have my client sessions at night, and thus, those classes don't work.  Between Acrylic Painting for Dummies and the book mentioned grabbing in my last post, How to Paint Citadel Miniatures, I think I'll be able to teach myself plenty in the weeks ahead.  It makes me feel like I'm going to have the know how to pick up my figure painting game and make some progress detailing my figures.

Yeah, that was a pretty intensely dorky sentence.  Moving on to the real meat of the update.

So where am I with the current project?

Revisions with the master plan have already taken place.  I was originally planning on dremeling down the rub zones, such as the knee, shoulder and elbow joints, on the figure, and then taking it apart.  Well, I tried that but the dremel had a hard time getting the joints without rubbing on the rest of the figure.  I didn't do much damage, but I noticed that things were not going according to plan.

So an alteration is in order:

Old:

1. dremel down the the rub points in the shoulders, elbows, hips and knees. 
2. disassemble the figure, including removing the lower legs/arms from the upper legs arms through the use of a hair dryer. 

OUTDATED.  DELETE OBSOLETE INSTRUCTIONS.  OVERWRITE.

New: 

1. disassemble the figure, including removing the lower legs/arms from the upper legs arms through the use of a hair dryer.
2. dremel down the the rub points in the shoulders, elbows and knees. 

INSTRUCTIONS UPDATED.  

PLAN ALTERATION COMPLETE. 
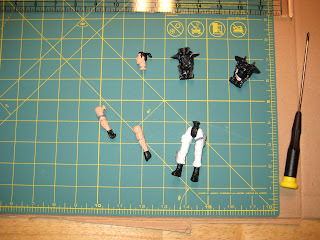
Score one for the The Corps action figures:
They are easy to take apart.
The good news is that it is really, really easy to take apart action figures from The Corps line. A single screw in the back holds the figure together.  That screw is easily reached by a Phillips head screw driver (sorry, don't remember the size, but it isn't an exotic gauge or incredibly small or anything like that- I had the right sized screw driver in my work bench.) Once the screw is removed, the front and back torso of the action figure come apart, and the waist, arms and head are easily removed.  Besides the screw itself, there are no other methods of fastening the figure together. No body cracking with a vice like you evidently need to do with modern GI Joe figures is necessarily, which is kind of nice.  The less opportunity for screw ups, I think, the better I will do at this point.
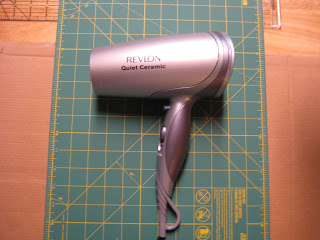
My wife's hairdryer to the rescue!
At the same time, this level of disassembly does not make it any easier to actually dremel down the knee, elbow or shoulder joints.  More work needs to be done to separate those parts.

Thankfully, I have done enough research about taking action figures apart to know there are two good and worthwhile methods to use here: either heat a joint with a hairdryer or put the pieces in a cup of water that has been in the microwave for a minute or so.  Because it seemed the hairdryer method would be easier to use if I needed to reheat the plastic, I went with that. 

Protect your digits.  Don't put them in front
of  streams of super hot air from hairdryers. 
Instead, put  plastic held by clothespins in front
of steams  of super hot air from hairdryers.

In order to keep from burning my fingers, I used a clothespin to hold the plastic limbs.   This kept my fingers from getting fried and allowed me to hold the plastic in front of the hairdryer set on hot for about 60 seconds, which is about what it seemed to take to get the plastic warm enough to pop the various joints.  While holding each joint in front of the hair dryer, I slowly turned the limb so that the joint was heated on all sides.

Another tool that helped to pop the joints apart was my Eklind multihex key tool.  These are great little tools that can be found for about $2 or $3 at the hardware store.  I used the smallest hex key on my foldout set to pry into the spaces of the joint and push the hot, flexible plastic apart.  The smallest tool on my kit was 5/64th inch or thereabouts, and the metal on plastic gave me a lot more leverage than I could have mustered using my fingers and fingernails alone.

And this little piggy pries plastic
joints apart all the way home.
The key to this step was patience.  The plastic is pretty malleable after 60 seconds of hot air from the hairdryer, and I was worried that I could tear it with the hex key if I got too rough.  Also, the plastic becomes cool fast.  I found that I had a good 20 seconds to work with the plastic after 60 seconds of heating.  Using my fingers alone didn't seem fast enough to take the joints apart.  If I couldn't get the joints popped in 20 seconds, I applied another round of 60 seconds of hot air to the joints, and tried again.

Eventually, everything worked just fine.  I went to school on the first few joints, and applied what I learned to the rest.  Each joint in this action figure was held together by a little peg.  The pegs had big end and small end, which will be nice later on because when I reassemble the figure, there is only one way for the pegs to be put back into each joint.  I learned quickly that trying to pry the small side of the peg from the joint was a much faster way to take the joint apart than by trying the big side or trying to pry both sides at once.  In a few minutes, I had all the joints popped apart.
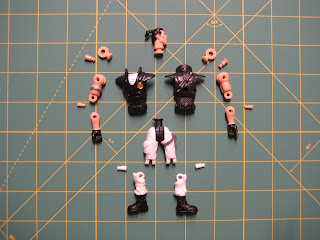
Woo hoo!
I gotta say, it was pretty satisfying to see Shinto-San all taken apart without any parts broken or other mistakes made at this point.  I could have tried to break the figure down even further: the pin joints of the elbows have pegs in them that attach them to the upper arm, allowing the joint to rotate in 3 dimensions, and the hips are connected to the lower torso by peg joints as well.  In both of these cases, I didn't think there was much give going on there to pop the joints, and I also didn't think these were vital areas to pop to make painting easier or dremel work look better, so I let sleeping dogs lie.

Because there were so many parts and because my wife and I have two loving, wonderful, sweet, and completely ADHD cats who will play with *anything* they can get their paws on that isn't nailed down, I have put all the pieces of the figure into little compartments to keep them secured. Each of the joint pegs are unique to the joint they fit into, so finding the correct peg for each joint should not be a deal later on, but I still separated the parts by portion of the body.  Even without cats, I didn't want to throw all of the parts into a drawer or something; they are small, and I figure the work I am putting into this project make taking a little care of accounting for all of the parts well warranted.  I would *hate* to get nearly done with all of this only to realize a forearm or knee joint was missing.

So that is where I am at the moment.  Finals are coming up, and I've got a ton of papers to research for and then write, but I hope to have at least all of the rub areas dremeled down and have an update on the project inside of a week.  Take care.

Until next time,

David D.

Sunday, October 9, 2011

Chairs made and stickers up!


Peg warmer Duke is now warming the security
desk chair in my soon to be completed GI Joe
Lobby and Tactical Operations Center model.
Well, its been a busy past few days in Lake Woebegone.  Got the chairs made and am starting to work on the computers.  I got some sticker project paper from Office Max nearby, both the clear sticker paper and the white stuff for the decals, and have started putting it all together.  So far, so good.  Its a slow slog, especially with the computers.  Each computer screen is three pieces, and there are going to be a total of 12 computers and four keyboards.  It'll take some time to get all that cut and ready, but its looking good in the mean time.

The chairs were super easy.  I was not sure if I'd be able to bend the styrene well, but all it took was a little exposure to a small flame, as discussed in the project instructions. I used a candle lighter we had in our junk drawer, and I did it outside and with a mask on, because I figure styrene fumes are probably not the best for my health.  Turns out that a few  seconds of flame exposure makes styrene super flexible.  Just to be safe, I marked the parts of the plastic where I wanted things to bend, and put the flame on each face in the zone where I wanted it to bend- front, back, and both sides.  I was not sure if the heat would be conducted through the plastic, and I'd rather not snap good material.  I probably held the plastic just above the tip of the flame for about seven or eight seconds per side for a single round- I didn't need to heat sides again after I cooked them the first time.  It worked so well on the back of the first chair that I kept doing it for the remaining four, and had no problems with any of them.

Chair in place, stickers coming along, and all I really have
left are the computer screens.  I hope to have this thing done
in the next few days.
I printed the decals from page three of the decals website at Vexar Designs (again, thanks very much Vexar).  They printed out a little small. It seems to me that they should be between 50%-100% bigger to be the same size as they look at on the Vexar Designs site pictures, but I'll manage.  If I do this again, I'd try using an image editing program to increase the size of the stickers by 50% and see how that works, but the moment is passed.  Nothing looks really bad, and actually, the stickers make things look much, much cooler, as they always do when it comes to GI Joe related stuff.

I also noticed (learning tip!) that any stickers that are going to end up on black styrene really need to be printed on white paper, because if it is on clear, it vanishes when it is put over the black background.  Made that mistake with the world map on the back war of the Tac Ops center, but it isn't too bad.  There are plenty of decals that will be stuck on white styrene that clear stickers will find a home someplace.

Other big learning point: I was hoping this item would be strong enough to actually handle play like a playset would.  Well, not so much.  The desks themselves are very fragile.  Not the entire structures, but if you put more than a little pressure on the desk surfaces, they pop right off whatever they are glued to.  This styrene set is going to be more of a diorama than a playset, but that's cool. It looks pretty sweet.

I need to get back to cutting black styrene for the computer screens, so I'll end this update here.

Until next time,

David D.

Wednesday, October 5, 2011

Desks up and How to Cut Styrene.

So far, so good.  Glad the painting stage is over.
Well, the painting adventure is over.  Cotton balls + mineral spirits got rid of the non plastic paint with no problems at all.  The next coat of paint went on and everything looks great.  ::phew:: that's nice.  I was worried the surfaces were going to look like crap forever.  One problem solved. So that was cool.  After the paint situation was resolved, I went on to add the desks, both in the tac ops center in the back and in the lobby.  The desks themselves are made from black styrene, the same stuff used to make everything else. 

Except this stuff is black, not white. 

I have some little piece work left to do: print out the decals from the website on some sticker project paper, and making the chairs and computers.  That will involve a great deal of cutting styrene sheets but I'm not too worried.  During this project, I have become a master at cutting styrene sheets.  I have wanted to do a 'how to cut styrene for beginners' tutorial for a while, and I may as well do one now since I have some time and I'm on the subject.  Here we go.

How to Cut Styrene

You will need: 

1. A  sheet of styrene
2. A pencil
3. A ruler/Straight edge
4. An Xacto knife/Razor/cutting blade of some sort.
5. Sandpaper (if you screw up.)

Recommended:
6. A desk/work bench makes things much easier.

1. Use a ruler to measure out the length of styrene you want on one side of the styrene sheet.  Mark point for length you using a pencil with a little dash mark on the styrene. (this works on white and black styrene.)  So if you have an 21x8 sheet of styrene and want a 6x8 panel, go 6 inches up from one end on the 21 inch side and mark a dash at 6 inches.

2. go to the other side of the sheet, and do the same thing.  So now you should have two dashes, both 6 inches away from the end.

3. Now flip the styrene over so the flat surface that was on top is now on bottom.  Do steps 1 and 2 again on the other side. 

4. Repeat steps 1 and 2 again to make sure you measured correctly from the ends (measure twice, cut once isn't a joke, and it will save you time if you screw up.) 

5. After you confirm (or remark) your dash marks with a pencil, use a straight edge, such as your ruler, to draw a line between the two dash marks.

6. Repeat step 3, which is to say, flip the styrene sheet over, double check your measurements.

7. Now repeat step 5 on the other side of the styrene sheet.  Use your straight edge to draw a line with your pencil to connect the two dash marks.

8. Now take out your knife.  You can use an Xacto knife, a razor, whatever.  I also use the straight edge, and score the styrene along the pencil line you just drew.  On one side of the styrene.  You can use the straight edge to guide your knife, making sure the score is straight.  Repeat this at least three times in one direction.

9. Important Note: you do not need to cut all the way through the styrene.  You just need to score it.  I spent a LONG time on the first few cuts of this project because I carved all the way through the styrene with my xacto knife.  I don't recommend it.  Learn from my mistakes!

10.  Now, score the line in the opposite direction at least 3 times.  If you were going right to left the first time (in step 8), now score the styrene from left to right.

11. Flip over the styrene.  There should be an unscored surface with a pencil mark facing up, and the scored surface should be facing down.  Repeat steps 8-10 on the other side.

12. Now you are done with your knife.  To be safe, first put the xacto cover back on your xacto knife or adjust your razor so it slides back into the tool's handle.  Stage 13 is going to be a little violent, and you do not want sharp objects around where sudden motions take place.

13. For best results, place the styrene on a flat surface, such as a desk or work bench, with the scored line right at the edge of the table or desk and the part you want to break off hanging over the table or desk.  Apply steady pressure to the styrene, with one hand on the part you cut to use in your project and one hand holding the part you want to have left over.  You do not have to do this quickly.  The first few times you try this you may not feel exactly how much pressure you need to place on the styrene to get it to break.  The styrene will bend.  Do not worry, it will snap back straight again when the piece breaks off.

14.  Very suddenly, the styrene will snap apart.  If you scored the styrene well, the line will be a very nice flat line.  If it was less well done, you may need to do some minor sanding to make the break line clean.

The key to this entire process is scoring the styrene well.  If you do good straight cuts, the break lines will be pristine.  Yes, you can just do one side of the styrene, but when I have tried going fast, in my experience it does not goes nearly as well.  Score both sides of the sheet.  The lines are much finer and need zero sanding to get what you want. 

Congrats!  You have cut your styrene!

I'll update this post soon with pictures for the styrene cutting steps.  Until then, enjoy the words.

That's all I have for now.  Until next time.

David D.